Air Layering: The Propagation Trick for Plants That Are Hard to Cut
Quick answer
Air layering is a propagation method where you wound a stem, pack it with damp sphagnum moss, and seal it with plastic wrap so roots form before you cut. It takes several weeks but gives you a rooted cutting from the start, making it especially reliable for rubber trees, monsteras, and other woody or hard-to-root plants.
Most propagation methods are essentially a bet. You cut a stem, stick it in water or soil, and hope it figures out how to grow roots before it runs out of energy. That works fine for a lot of plants. But for woody stems, big overgrown plants, or anything that tends to rot before it roots, there’s a better way — one where the plant has already done the hard part before you ever pick up the scissors.
Air layering flips the whole process around. Instead of cutting first and hoping for roots, you encourage roots to form on the stem while it’s still attached to the mother plant. The plant keeps feeding that stem the whole time. By the time you cut, you’re not transplanting a cutting — you’re transplanting a small rooted plant. That’s a very different situation.
Why Air Layering Works When Regular Cuttings Don’t
With a standard stem cutting, the clock starts the moment you cut. The cutting has no roots, no way to take up water, and it’s burning through whatever energy it stored before the cut. If it doesn’t root fast enough, it’s done.
Air layering removes that race. The stem stays connected to the mother plant throughout the whole rooting process, so it’s not stressed, not drying out, and not in a hurry. It just slowly puts out roots into the damp moss you’ve packed around the wound. Then you cut it off once it’s ready.
That’s why this method is so useful for:
- Rubber trees (Ficus elastica) — woody stems that are slow to root and prone to rot in water
- Monsteras that have gotten leggy — when the lower leaves have dropped and the stem is bare, air layering lets you salvage the top growth with roots already attached (more on that in My Monstera Got Way Too Big. Here’s How I Dealt With It)
- Fiddle leaf figs — notoriously difficult from cuttings, much more forgiving with air layering
- Dracaenas and large philodendrons — anything with a thick stem that you’re not sure will root before it rots
If you’ve been doing water propagation and finding it hit or miss, it might also be worth reading Water Propagation vs. Soil: One of Them Is Setting You Up for Failure — water works great for some plants and really doesn’t for others.
What You Need Before You Start
Nothing exotic here. You probably have most of this already.
- Sharp, clean knife or pruning shears
- Halatool Natural Sphagnum Moss (9oz) — long fiber sphagnum moss works best because it holds moisture well and roots grow into it easily
- Clear plastic wrap (clear is important so you can see the roots without unwrapping)
- Floral tape, electrical tape, or twist ties to seal the plastic
- A bowl of water to soak the moss
That’s it. No rooting hormone is required, though you can use it if you want — I’ve gotten good results both ways.
How to Air Layer a Plant: Step by Step
Step 1: Pick the Right Spot on the Stem
Find a section of stem that’s healthy, has at least a few nodes, and is below some good leaf growth. On a leggy monstera, this is usually just below where the leaves start again. On a rubber tree, pick a spot that’s about 12 to 18 inches from the tip.
Remove any leaves right at the spot where you’re going to wound the stem — you need a clean section to work with.
Step 2: Wound the Stem
There are two ways to do this, and either works:
Option 1 — Ring method (girdle): Use a sharp knife to remove a ring of bark about 1 to 1.5 inches wide, all the way around the stem. You want to cut down to the lighter wood underneath and remove that outer layer completely. This interrupts the flow of nutrients downward and encourages the plant to push roots out at that point.
Option 2 — Angled cut method: Make an upward angled cut about a third of the way through the stem, then prop it open with a toothpick or small piece of moss so it doesn’t close back up.
For most houseplants — monsteras, rubber trees, figs — the ring method tends to give faster, more reliable results. The angled cut works well for softer-stemmed plants.
If you want, dust the wound with a little rooting hormone powder at this stage. Not necessary, but it can speed things up a bit.
Step 3: Prep Your Moss
Take a good handful of sphagnum moss and soak it in water for a few minutes, then squeeze out the excess. You want it damp — like a wrung-out sponge — not dripping wet. Too wet and you risk rot. Too dry and roots won’t form.
Step 4: Pack the Moss Around the Wound
Take a big clump of that damp moss — bigger than you think you need, roughly the size of a softball — and pack it firmly around the wounded section of stem. You want full coverage, with the moss extending a couple inches above and below the wound.
Step 5: Wrap It Tight
Wrap the whole moss ball in clear plastic wrap. Start below the moss, wrap up and over, and keep going until the whole thing is covered. You want it snug enough that there are no air pockets.
Seal both ends tightly with tape or twist ties. This is important — if air gets in and dries out the moss, you’ll lose your progress.
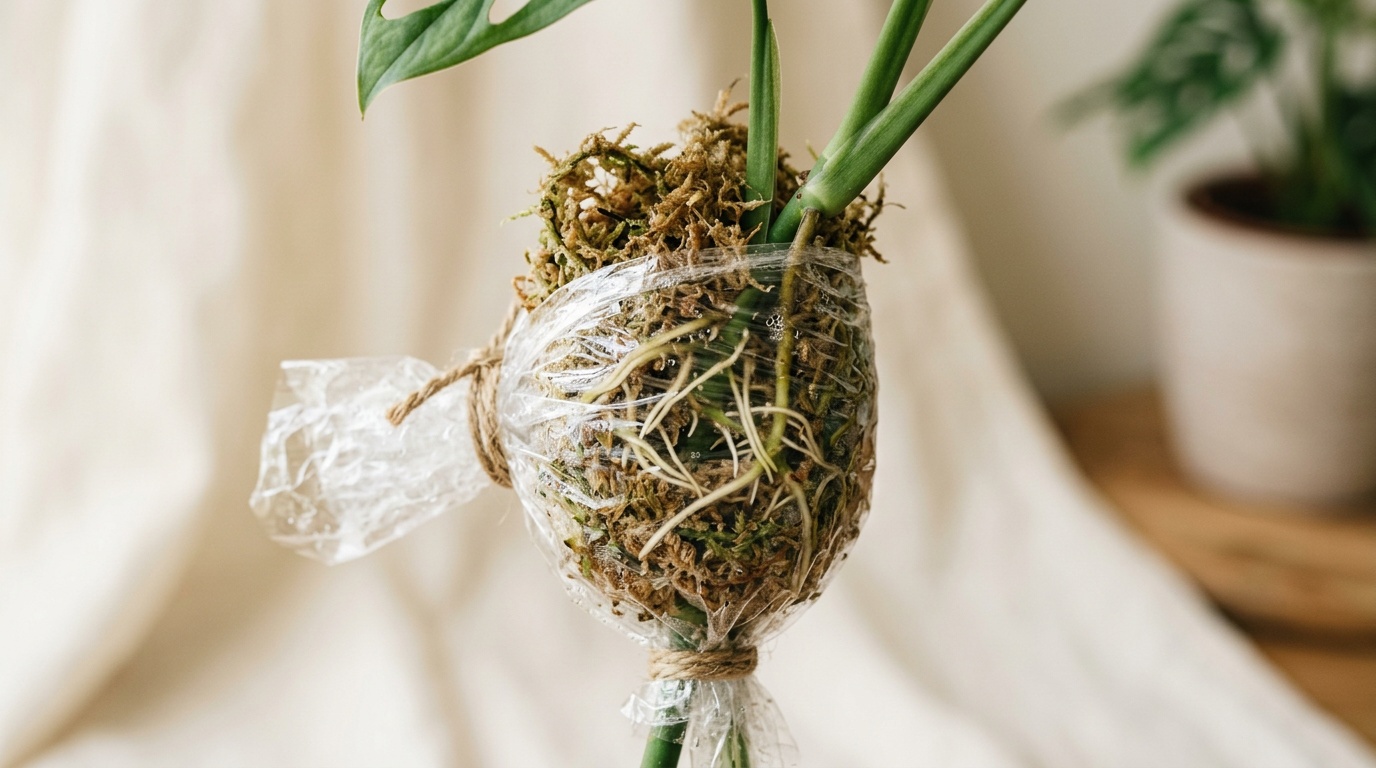
The whole thing should look like a little green ball wrapped in plastic attached to your plant’s stem. A little funny looking, but it works.
Step 6: Wait
This is the part where you just leave it alone. Most plants will start showing roots in 4 to 8 weeks. Slower-growing or woodier plants might take 2 to 3 months.
Check it every week or two. Because you used clear plastic, you can see right through to the moss without disturbing anything. What you’re watching for is roots growing into and through the moss — white, healthy-looking roots.
Don’t cut until you have a solid network of roots, not just one or two. A few thin threads aren’t ready. You want to see roots filling out the moss ball before you make the cut.
How to Tell When It’s Ready
This is probably the question I get asked most about air layering, and the honest answer is: you’ll know it when you see it.
When it’s not ready, you might see a couple of small white root tips poking into the moss. When it’s ready, you’ll see roots filling up a good portion of the moss ball — multiple roots, growing in different directions, looking sturdy.
If you’re not sure, wait another week or two. Cutting too early is the main reason air layering fails at the finish line. The plant is still attached to its mother and isn’t going anywhere — there’s no rush.
Cutting and Potting
Once you’ve got a good root system, cut the stem just below the moss ball. You want to keep all those roots intact.
Carefully remove the plastic wrap, but leave the moss in place around the roots. The roots will have grown into it and trying to pull it off will damage them. Just pot the whole thing — moss and roots together — into a pot with good drainage and a mix that won’t hold too much moisture.
I’ve found most plants do well when I pot them into a mix of 4 parts coco husk fiber, 4 parts sphagnum moss, 1 part orchid bark, and a small amount of worm castings and charcoal. It’s light, it drains well, and the roots seem happy in it. Regular store-bought potting soil works too, especially if you mix in some perlite to loosen it up.
Water it in well, then treat it like a freshly repotted plant. Give it bright indirect light, hold off on fertilizer for the first few weeks, and don’t panic if it droops a little at first. It just went through something and needs a minute to adjust.
Air Layering vs. Stem Cuttings: Which Should You Use?
| Air Layering | Stem Cutting | |
|---|---|---|
| Time to roots | 4–12 weeks (on the plant) | 2–6 weeks (off the plant) |
| Success rate | High — plant stays supported | Variable — depends on plant type |
| Best for | Woody stems, leggy plants, large plants | Soft-stemmed plants, small cuttings |
| Stress on mother plant | Low | Low to moderate |
| Complexity | Medium — a few steps | Easy |
Stem cuttings are faster and simpler for plants that root easily — pothos, tradescantia, soft-stemmed philodendrons. If you’ve found a method that works well for those, there’s no reason to switch. But for the plants that give you trouble, air layering is worth the extra steps.
If you want to see another solid alternative to water propagation, The Propagation Method I Switched to That Works Better Than Water covers a technique that’s changed how I propagate a lot of my plants.
A Few Tips That Actually Make a Difference
Keep the moss consistently damp. If you notice it drying out, carefully open a small gap in the tape, add a little water, and reseal. Dry moss means no roots.
Warmth helps. Rooting happens faster when the plant is warm. If your house runs cool in winter, expect things to take longer.
Don’t move the plant around a lot. Once you’ve got the air layer set up, try to leave the plant in one spot. Every time you jostle it, you risk disturbing any early root growth.
Label it. If you have multiple plants going at once, write the date on the plastic wrap with a marker. It’s easy to forget when you started and whether four weeks have passed or six.
Air layering is slow, and it does look a little silly with that plastic-wrapped lump on your plant. But when you cut it off and see that moss ball full of healthy roots, it’s a really satisfying feeling — and the new plant has a genuinely good start.
Frequently asked questions
What is air layering for plants?
Air layering is a propagation technique where you wound a stem while it's still attached to the mother plant, pack the wound with damp sphagnum moss, and seal it with plastic wrap. Roots grow into the moss over several weeks. Once you can see a good root system through the plastic, you cut the stem below the roots and pot it up. Because the cutting is already rooted when you remove it, it has a much higher chance of surviving than a fresh cut.
How long does air layering take?
Most plants show visible roots in the moss within 4 to 8 weeks, though some woody or slower-growing plants can take 2 to 3 months. Warmth and humidity speed things up. Don't rush it — wait until you see a solid mass of roots before you cut.
What plants can be air layered?
Air layering works well on rubber trees (Ficus elastica), monsteras, fiddle leaf figs, dracaenas, philodendrons, and most plants with thick or woody stems. It's especially useful for plants that have gotten leggy, overgrown, or are difficult to root from a standard stem cutting.
Why is my air layering not rooting?
The most common reasons are moss that dried out, plastic that wasn't sealed tightly enough, or not enough time. The moss needs to stay consistently damp the whole time — if it dries out, rooting slows or stops. Check your seal at both ends and add a little water through a small opening if needed.